Marketing and advertising rely on data analytics. You need to have a clear understanding of how your target audience interacts with your website. This is achieved by tracking visitor activity on your website. While Google Analytics provides you with a lot of useful data about your website traffic and Google Ads, it has several limitations such as data approximation and the need to set up tracking for specific projects.
Google Tag Manager solves your tracking problems forever. It works with Google Analytics, Google Ads, and all Google and non-Google products. Let’s get to the nitty-gritty and find out what exactly is Google Tag Manager (GTM) and how you can use it.
What is Google Tag Manager?
It is a tag management system that lets you manage all your tags quickly and easily. Google Tag Manager simply manages your tags. It is a free, non-technical tag management system that anyone can use to track pretty much anything one wants.
It has a clean and easy-to-use dashboard where you can create, edit, and view all the tags. It is designed to be non-technical and easy UX which means you don’t have to be a full stack developer to use GTM and manage tags.
Here is how the dashboard looks like:
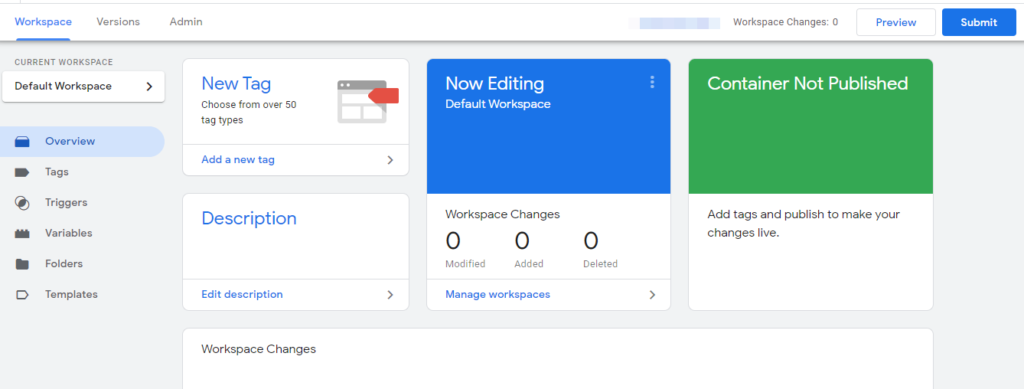
You can instantly create new tags (from existing tags), create triggers and variables, and organize your tags in folders and templates. For example, if you want to measure the scroll depth of the website visitors, you can create a scroll depth trigger that will track vertical and horizontal scroll depth automatically.
The best part: GTM has a single tag that means you just have to place one tag on your website and leave the rest on it.
Why Use Google Tag Manager?
Before you move ahead and learn how to use Google Tag Manager, you must understand its usefulness. Why do you need to use GTM in the first place especially when you are already using Google Analytics.
Here are the key benefits of using GTM:
1. No Coding Required
If there is one thing that makes GTM the best in the game, it is its non-technical nature. You don’t need to amend your website’s coding to change or edit a tag. In fact, there isn’t any need for a developer to create, revise, and manage tags.
Google Tag Manager uses a graphical interface that anyone can use to deal with tags. This makes it ideal for marketers and business owners who need to test and tweak tags daily.
2. Advanced Tracking
GTM does a lot of things that your traditional analytical tool won’t (including Google Analytics). It improves data tracking and analysis to a great extent.
It is not less than a game-changer.
You can track clicks, forms, scrolling, visibility, history, videos, pages, errors, and much more. You can define your variables and track whatever you want using GTM. This is what makes it superior to any other tracking and tagging tool.
3. Manageable and Easy-to-Use
Large businesses that run several PPC campaigns and target different countries have to create several tags and it gets complicated to manage everything.
Airbnb, for example, used Google Tag Manager to improve its vendor data collection to 90%. It used to run 88 different audience lists and more than 100 different tags. Management wasn’t easy. Switching to GTM helped Airbnb to create, test, and deploy tags in minutes.
Google Tag Manager doesn’t just help you manage tags but it does so without any technical barriers making it a lean process that speeds up the results (without compromising quality) of your attribution and marketing goals.
How to Use Google Tag Manager
Impressed with the GTM, can’t wait to start using it?
Well, getting started with Google Tag Manager is easy and free. Click here to sign up with your Google account. Once you have signed up, you are all set to start using GTM.
How to Install Google Tag Manager
When you sign up for GTM, a new container will be created automatically. A container contains all the tags for your website. You’ll need to add or install the container to your website. This is a single code that you’ll need to add to your website to install GTM.
Click the code in your dashboard:

This will open the GTM installation code that you have to add to your website’s head and body. It looks like this:

Copy both these codes and paste them into your website’s head and body as instructed. If you are using WordPress, you can use a plugin to add GTM code on all your website pages. There are several free plugins available to choose from such as Google Tag Manager for WordPress and Insert Headers and Footers.
Once you have added the code via plugin or directly into the website’s code, you are all set to using GTM.
How to Use Google Tag Manager
After you have installed Google Tag Manager, it is time to start using it. Here is an overview of the key features and things you can do with GTM:
Adding People to Your Tag Manager
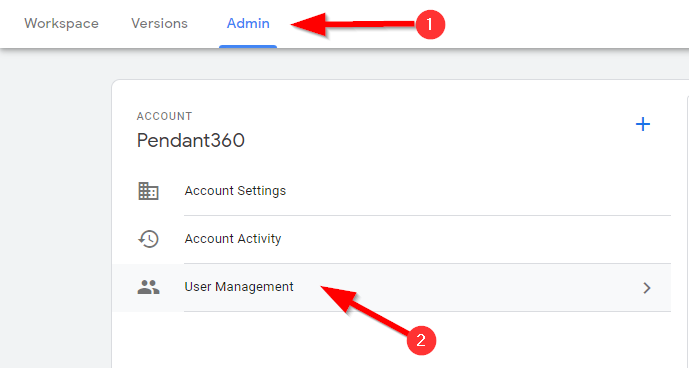
Adding team members is the first thing to do so that the relevant people can access and use Google Tag Manager. Click Admin in your GTM Dashboard and then click User Management:
Click the blue add button and then click Add users to add people:

Fill the form to send invitations to team members. Add email addresses, give permissions (administrator vs. user), and contain permission that includes publishing, approving, editing, and reading tags, triggers, and variables:
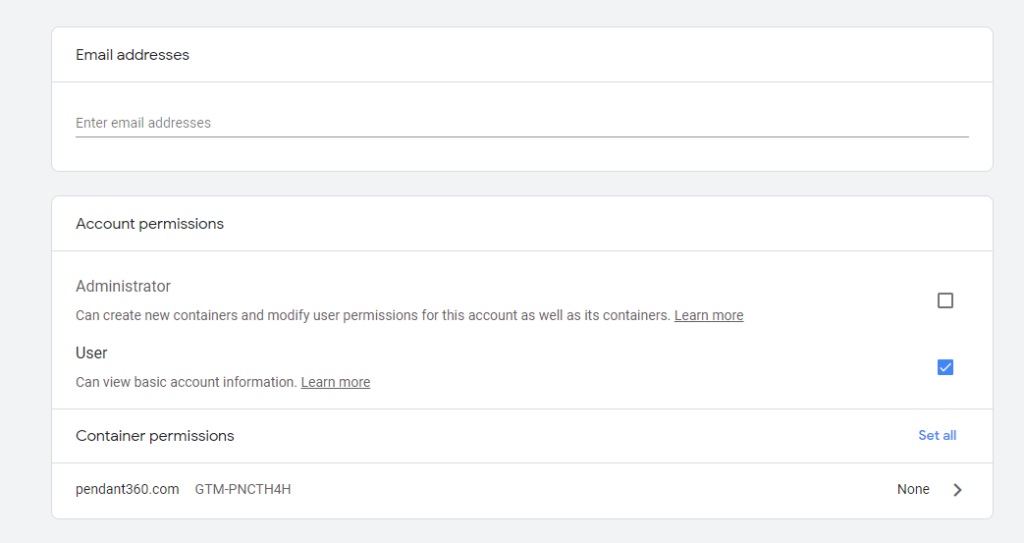
Click Invite to send invitations to the people.
Navigating Your GTM Account
When you sign in to your GTM account, you’ll see a list of containers. Each container represents a different website or app that you manage. Click the relevant container to visit its dashboard:

Your dashboard has three sections: Workspace, Versions, and Admin:
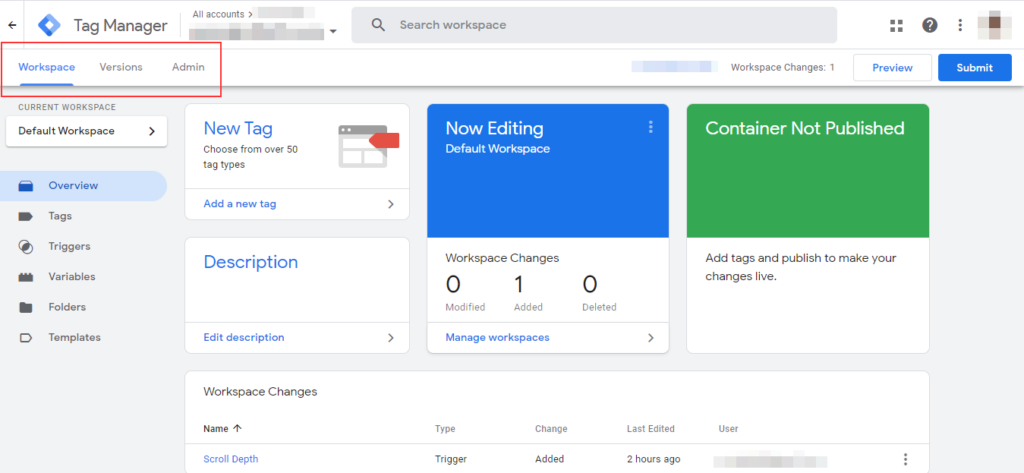
The Workspace is the work area that includes your tags, triggers, and everything else. The Versions shows the versions and updates of the container once it is published. The Admin area is visible to those who have administrator access to GTM.
You can navigate to different sections of your workspace from the left sidebar:
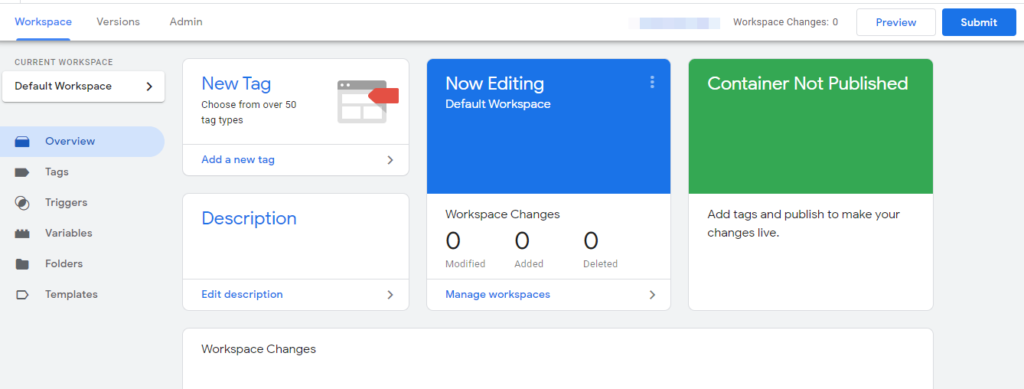
The overview section shows an overview of the account and workspace including workspace changes that show a history of edits and revisions with user details.
Managing Tags in GTM
You can manage tags from the Tags section in your GTM account. You can access it from the sidebar:
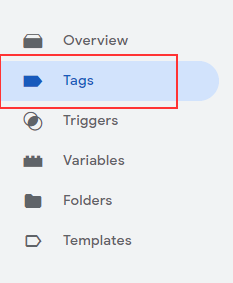
Click New to add a new tag:

You have to give a name to the tag, configure it, and add a trigger that will trigger this tag:
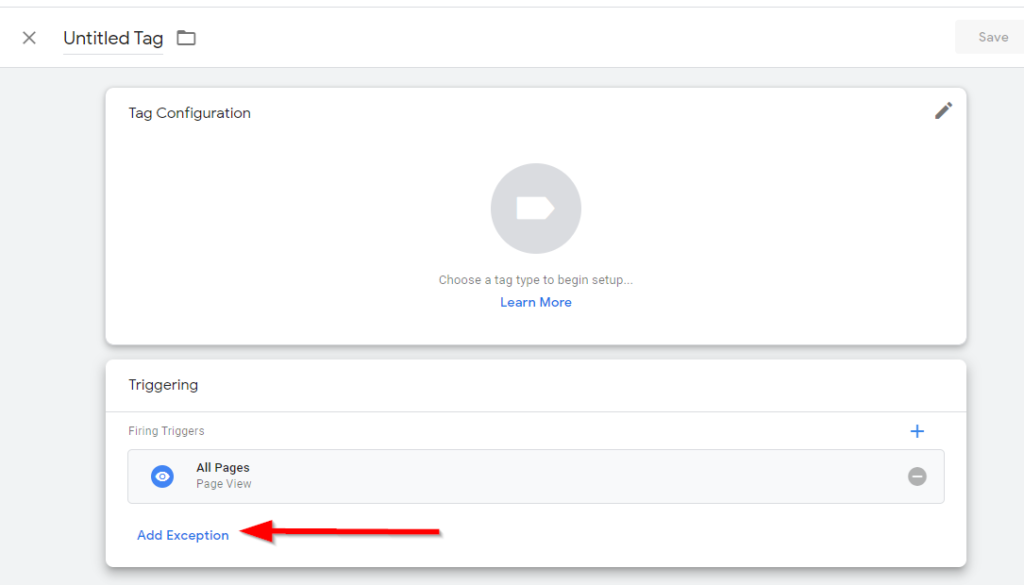
Click Tag Configuration to choose a tag type from the list. Select a tag or use the search function to find one:
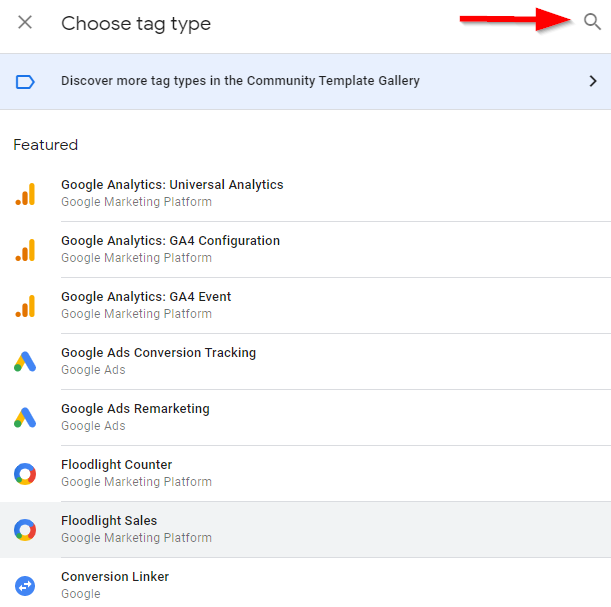
All the tags will be visible in the Tags section that you can manage and organize easily.
Managing Triggers in GTM
This is the section where you’ll create and manage triggers. A trigger is a rule that ‘triggers’ or ‘fires’ a tag and is a compulsory part of your tag. When you create a tag, you’ll be asked to choose a trigger. A tag is useless without a trigger because it won’t fire (aka work).
You can create triggers by clicking New from the Triggers section:

You can choose a trigger from the list of the available triggers:
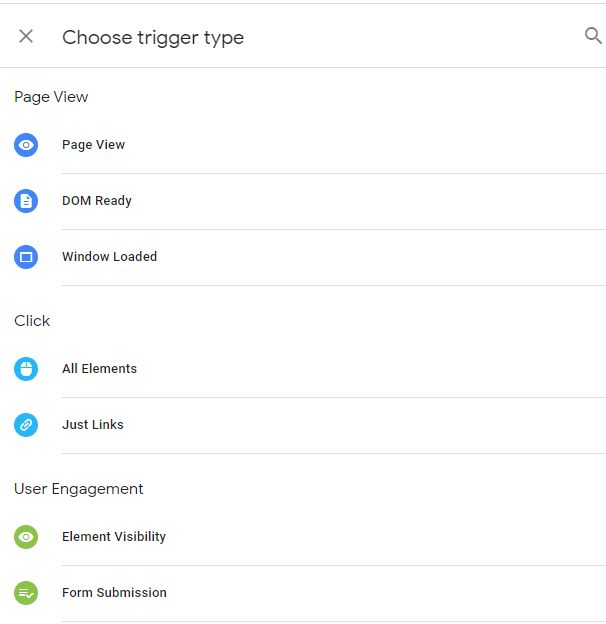
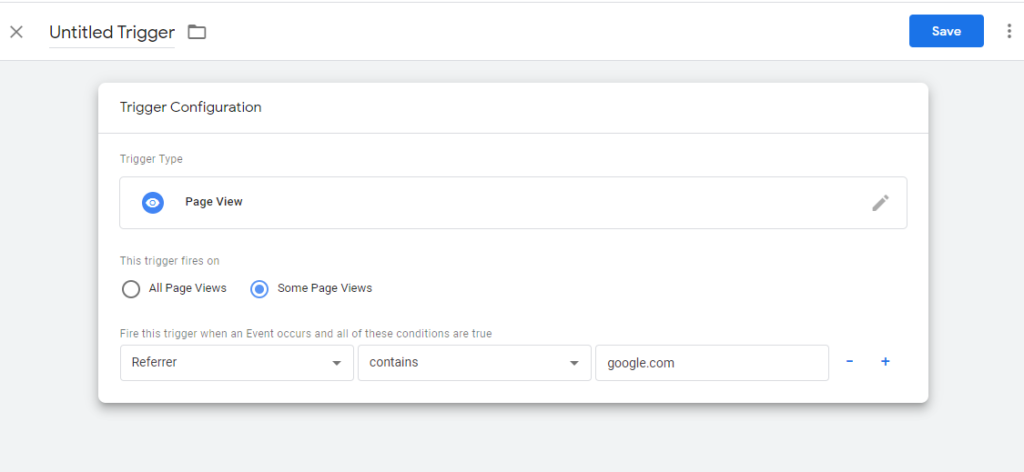
You can edit the selected trigger based on your tracking requirements by adding filters:
All the triggers will appear in the Trigger section with details and tags a trigger will fire:

You can create unlimited triggers with filters of your choice.
Managing Variables in GTM
Variables are used to set criteria for both triggers and tags. Triggers are fired based on the value of the variable while tags use variable information for data collection. GTM has a lot of built-in variables for several categories such as pages, utilities, clicks, errors, scrolling, and more:
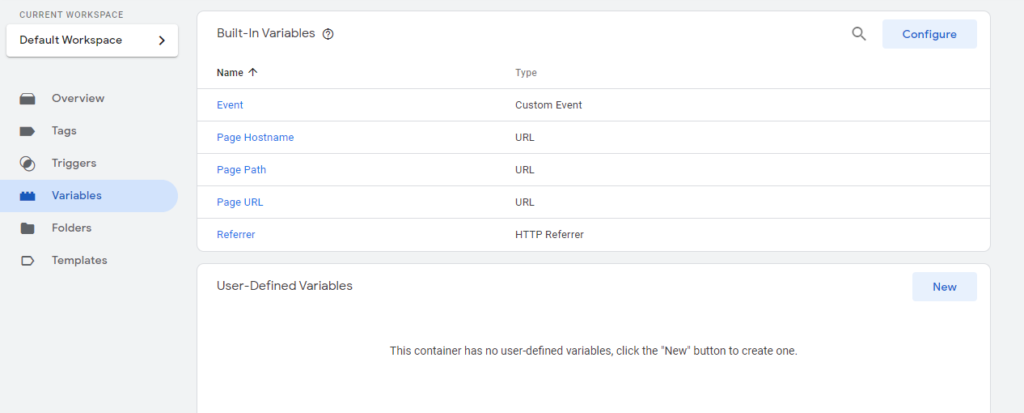
The best part: You can define variables based on your requirements. You can access variables from the left sidebar of your GTM account dashboard.
Managing Folders in GTM
Folders let you group tags, triggers, and variables based on some criteria. For example, you can create a folder for a specific marketing campaign that contains all the relevant tags, triggers, and variables for that project.
It is quite a handy feature for large businesses and marketing agencies that work on several triggers and tags simultaneously and work on different projects.
You can access folders from the left sidebar and click New Folder to create a folder:

Select items and click Move to move them to the desired folder:
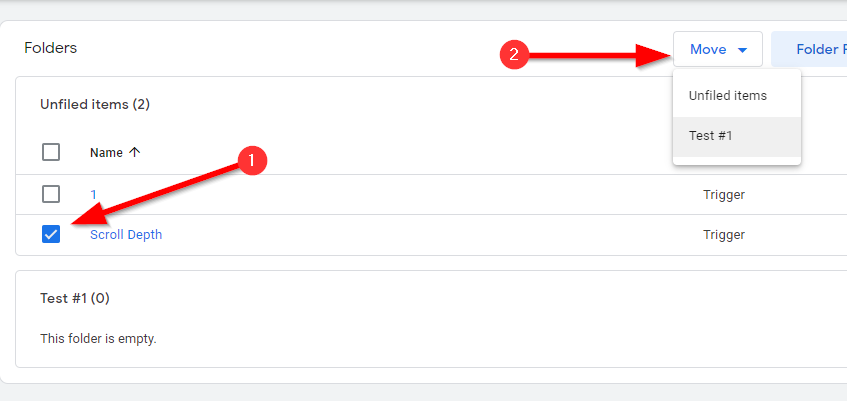
Folders help you keep your work organized and manageable. You and your team will never feel lost and can access relevant tags, triggers, and variables quickly.
Google Tag Manager FAQs
So, you know how to use Google Tag Manager and how to get started with it. If you still have unanswered questions about GTM, check out the following list of the most common questions and their answers:
What is a Trigger in Tag Manager?
A trigger monitors your website for events and conditions such as a click. When a certain condition is met (e.g. button click), it tells the tag to fire. A tag must have at least one trigger so that it can fire or block when the condition is met.
What is the difference between Google Analytics and Google Tag Manager?
These are two different products by Google that have different purposes. Google Analytics is an analytics tool that tracks and monitors your website using a tracking code. It shows data to the end-user in the form of reports and charts.
Google Tag Manager is a tag management system (not a tool) that manages different tags and codes. It collects and sends data to your analytics tool (including Google Analytics) where you can generate reports.
If you are using Google Analytics you don’t have to necessarily use GTM. But if you are using GTM, you must use Google Analytics (or any other analytics tool) to view data generated by the tags.
How do I view Google Tag Manager data?
The data is visible in your Google Analytics account or any other analytics tool you are using. You have to integrate your analytics tool with the GTM to view data. GTM itself doesn’t show you any data as it only manages tags.
How do I know Google Tag Manager Works?
GTM has preview and debug mode that lets you preview your tags in real-time once you publish them. Enable preview and debug mode from your dashboard. It will show you if your GTM is working fine. You can navigate your website in debug mode to see if tags are working properly.
What can your Google Tag Manager track for you?
It can track pretty much everything you want it to. There is a huge list of triggers and variables that cover clicks, forms, videos, and more. The key triggers you can track include page view, clicks, and user engagement. Since it allows you to define variables, this makes GTM very flexible in terms of what it can track for you.
The sky is the limit when it comes to GTM tracking.
How does Cross-Domain Tracking work in GTM?
Universal Analytics tags help you track cross-domain data easily. You can track data across multiple domains (that you own) and consider them all as one big domain. You can enable cross-domain tracking in the following simple steps:
- Enable Google Universal Analytics
- Edit the desired tag by clicking More Settings > Fields to Set and add allowLinker in the Field Name and true in the value
- Next, move to Cross Domain Tracking and add all the domains separated by the comma that you want to track.
- You have enabled cross domain tracking.
How to exclude your own IP address in GTM?
Google Tag Manager does not have any feature to block internal traffic from a specific IP address. However, you’ll need to exclude traffic from your own IP address in Google Analytics using the following steps:
- Sign in to your Google Analytics account and click Admin from your desired account
- Click All Filters in the Account column
- Click Add Filter
- Give a name to the filter, select Predefined > Exclude > Traffic from the IP addresses > That contain
- Enter your IP address
- Select All Website Data and click Save.
How to add exceptions for Tags in GTM?
You can add an exception for tags in Google Tag Manager that will stop them from firing under certain conditions. When you are creating a tag, you can add exceptions when adding triggers. Click Add Exceptions below the Firing Triggers at the Tag creation stage:
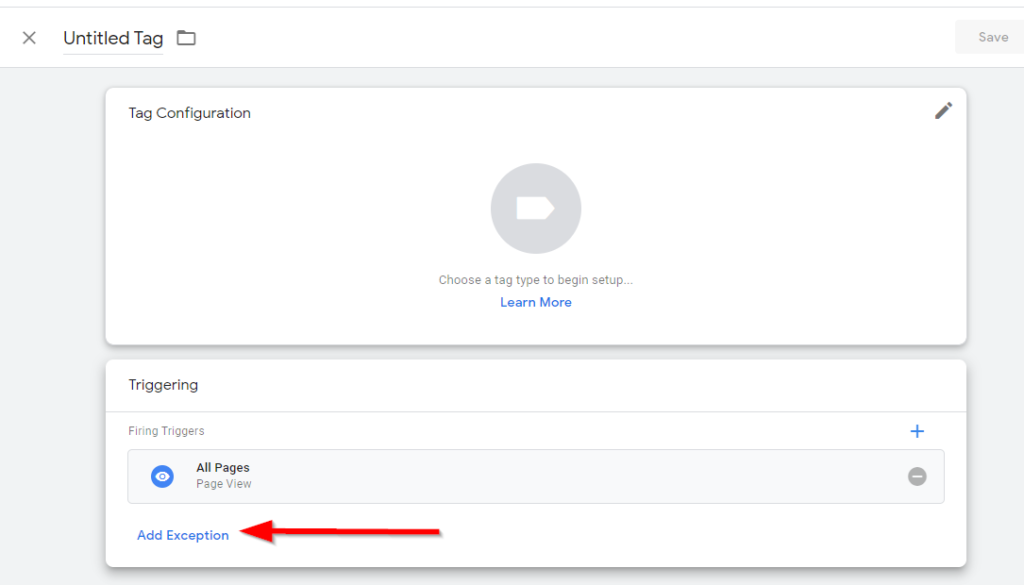
Add the exception trigger for the tag.
How to get alerted to JavaScript errors via GTM?
You can JavaScript error triggers in Google Tag Manager that will alert you of the errors. This requires creating a trigger. Follow these steps to create the trigger:
- Create a new trigger
- Choose JavaScript Error from the trigger type
- Select All JavaScript Errors and click Save.
It will automatically create built-in variables that include Error Message, Error URL, and Error Line.


